


A heat shrink tubing size chart is the fastest way to stop the two mistakes that waste spools: buying tubing that will not slip over the connector, or buying tubing that shrinks to a diameter wider than the wire it is meant to grip. Heat shrink only works if the supplied (pre-shrink) inner diameter clears your object and the recovered (post-shrink) diameter sits snugly below it. For buyers sourcing heat shrink tubing, this guide explains how to read the chart, choose the shrink ratio, and avoid the gaps that let moisture in.
The Two Numbers That Matter
Every heat shrink tube is specified by two inner diameters:
- Supplied ID — the relaxed diameter before heating. It must be at least 10–20% larger than the largest object you are covering (the connector, the splice, the bundle).
- Recovered ID — the diameter after full shrink. It should be smaller than the underlying wire or substrate so the tube grips rather than floats.
The shrink ratio is simply supplied ÷ recovered. A 2:1 tube that starts at 4 mm ends near 2 mm. A 3:1 or 4:1 tube starts larger and pulls down tighter, which is what you want for irregular shapes like connectors and strain reliefs.
Reading a Heat Shrink Tubing Size Chart
Use the chart below as a starting point. Measure your object’s outer diameter, pick a supplied ID that clears it, then confirm the recovered ID grips the wire beneath.
| Supplied ID (mm) | Recovered ID @ 2:1 (mm) | Typical wire range (AWG) | Common use |
|---|---|---|---|
| 1.6 | 0.8 | 26–22 | Fine signal wires, splices |
| 2.4 | 1.2 | 22–18 | Sensor and control wires |
| 3.2 | 1.6 | 18–16 | General low-current insulation |
| 4.8 | 2.4 | 14–12 | Power wires, small connectors |
| 6.4 | 3.2 | 12–10 | Connector boots, joints |
| 9.5 | 4.8 | 10–8 | Battery and harness branches |
| 12.7 | 6.4 | 8–4 | Cable bundles, strain reliefs |
| 19.0 | 9.5 | 4–1 | Large harnesses, enclosures |
Figures are typical for 2:1 polyolefin. Always check the specific product’s supplied and recovered diameters, because tolerances and compounds vary.
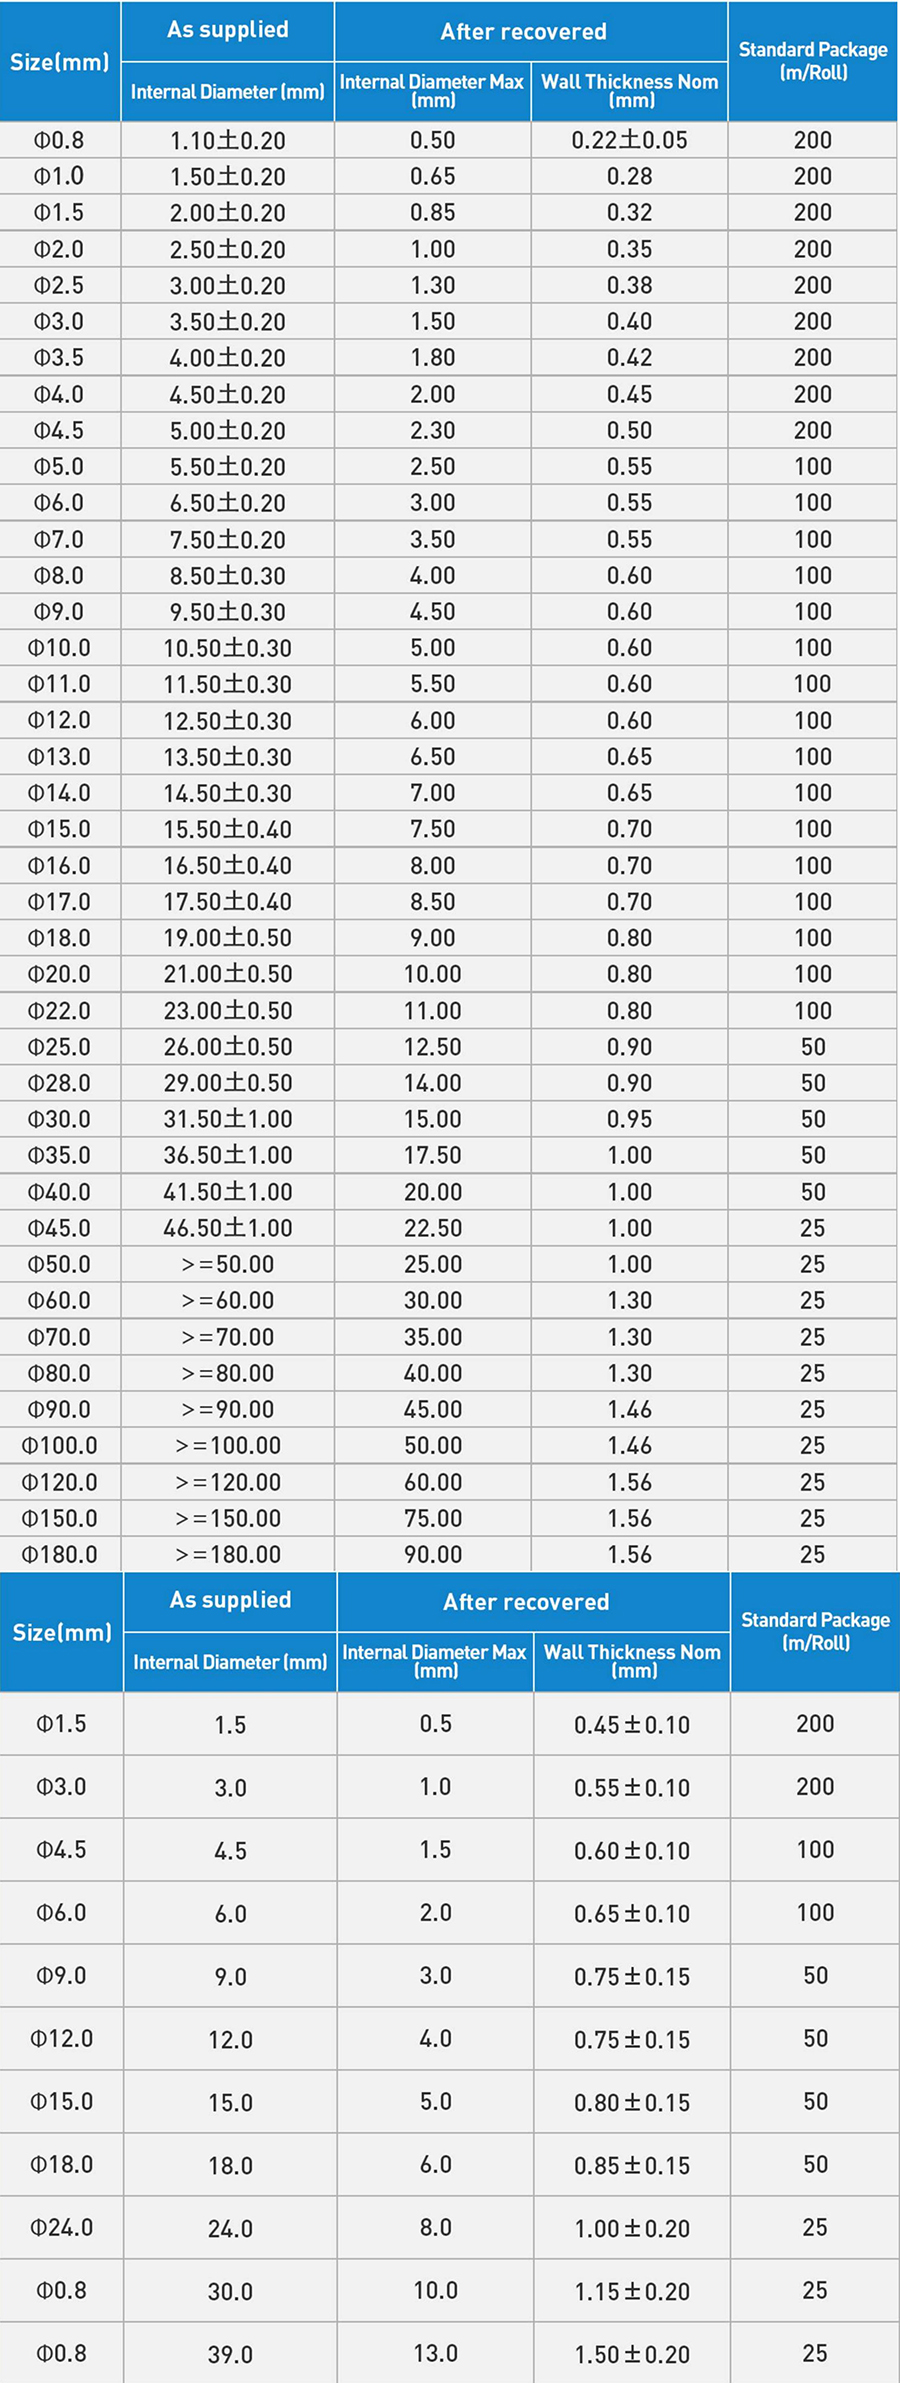
Niuli Heat Shrink Tube Specifications
How to Choose the Shrink Ratio
- 2:1 — standard insulation and marking. Covers wires and simple splices where the profile is fairly uniform.
- 3:1 and 4:1 — use where the object is much larger than the wire, such as a connector barrel or a bulged splice. The higher ratio lets one size cover both the fat and the thin section.
- Dual-wall adhesive-lined — the inner melt adhesive flows and seals the interface. This is the right choice for outdoor and underground joints, as discussed in our comparison of dual-wall vs single-wall heat shrink tubing for environmental sealing.
Diameter Selection in Practice
Suppose you are covering a 5 mm outer-diameter connector that joins two 2.5 mm² wires (about 3.5 mm OD after the splice). A 6.4 mm supplied / 3.2 mm recovered 2:1 tube clears the 5 mm connector and shrinks to grip the 3.5 mm wire. If instead you pick a 4.8 mm supplied tube, it will not slip over the connector at all. If you pick a 12.7 mm tube, it shrinks to 6.4 mm — wider than the wire — and just floats, defeating the seal. The heat shrink tube set with assorted diameters is a practical way to keep the common sizes on the bench.

Length and Wall Thickness
Diameter is not the only dimension. Cut the tube at least 10–15 mm longer than the joint so both ends overlap clean wire for a sealed grip. Wall thickness affects abrasion and voltage rating: thin-wall for tight harnesses, thick-wall for mechanical protection. For cable bundling where you do not need heat activation, spiral wrapping bands are a reusable alternative covered in our corrugated tube vs spiral wrapping bands comparison.
Common Heat Shrink Sizing Mistakes
- Forgetting recovery. A tube that fits the connector but recovers wider than the wire will not seal.
- Skipping the 20% clearance. It must slide over the largest feature; measure the connector, not the wire.
- Wrong ratio for bulky joints. Use 3:1/4:1 where the profile varies a lot.
- Single-wall outdoors. Without adhesive lining, water wicks in along the wire under the tube.

Shrink Temperature and Recovery
Polyolefin heat shrink typically begins to recover around 90–110 °C and fully shrinks by about 125 °C. That is well below the melting point of common wire insulation, which is why a heat gun is safe on installed cables — but it also means a hair dryer is usually too weak to get a tight recovery, and an open flame risks scorching the tube and the wire. Use a controlled heat gun and rotate the joint so recovery is even. The recovered diameter in the size chart assumes full, proper heating; under-shrinking leaves the tube loose and the seal incomplete.
Color Coding and Marking
Heat shrink is available in black, red, blue, yellow, green/yellow, and clear, among others. Color is used both for phase/bus identification and for marking. For permanent identification, pre-printed or write-on heat shrink sleeves are crimped or slipped over the wire and shrunk in place, surviving abrasion and solvents far better than tape labels. When choosing sizes for marking sleeves, the same chart logic applies: the supplied ID must clear the wire, and the recovered ID must grip it.
Storage and Shelf Life
Heat shrink tube has a shelf life. The memory of the expanded shape is held by the cross-linked polymer, but prolonged exposure to heat or UV slowly relaxes it, and the inner adhesive in dual-wall types can weep or skin over in storage. Keep rolls and reels in a cool, dry place away from direct sunlight, and observe the manufacturer’s shelf-life date for adhesive-lined products. Tube that has been stored in a hot warehouse for years may not recover cleanly even at the correct temperature.
Wall Type and Voltage Rating
Thin-wall tubing is for identification and light insulation on low-voltage wiring; thick-wall and medium-wall grades add mechanical protection and higher voltage ratings, used on busbars and medium-voltage joints. Always match the wall thickness and voltage rating to the application — a thin-wall 600 V tube is not a substitute for a medium-wall joint on a higher-voltage cable. For bundling where heat activation is undesirable, spiral wrapping bands remain a reusable alternative.
Application: A Step-by-Step Shrinking Routine
Choosing the size is half the job; applying it correctly is the other half. A reliable routine:
- Slide the tube on first. This is the step everyone forgets after crimping a connector — the tube must go on the wire before the terminal is attached.
- Position over the joint. Center the tube so it overlaps clean wire on both sides by at least 10–15 mm.
- Heat evenly. Use a heat gun on a medium setting, rotating the work so heat reaches all sides. Start from one end and move along to push trapped air out.
- Watch the recovery. The tube should hug the profile tightly with no wrinkles or un-shrunk sections. For adhesive-lined types, a thin bead of melted adhesive at each end confirms a sealed interface.
- Cool before handling. The tube is soft while hot; let it set so the recovered shape locks in.
Following this routine with the correctly charted size produces a seal that resists moisture and abrasion. Skipping step one (forgetting to pre-slide the tube) is the single most common field error and forces a redo.
Buying Heat Shrink: Reels vs Assorted Sets
For production lines, full reels in the two or three diameters you use most are the economical choice and avoid the downtime of running out mid-job. For service vans, maintenance shops, and prototype work, an assorted heat shrink tube set covering 2:1 and 3:1 ratios in the common sizes keeps the right diameter on hand without overstocking. When ordering, confirm the recovered diameter rather than just the supplied size, and note the wall type and temperature rating on the label so the correct tube is grabbed under time pressure. A small investment in organized storage pays back by preventing the classic mistake of using a single oversized tube “because it was the only one left.”
Heat Shrink vs Spiral Wrap: Picking the Bundling Method
Heat shrink is for sealing and insulating individual joints and short runs; it is not a cable-bundling method on its own. For organizing a whole harness, spiral wrapping bands or corrugated conduit are the alternatives, and the choice between them is covered in our corrugated tube vs spiral wrapping comparison. The point is to use heat shrink where a sealed, recovered sleeve is needed and a different method where you only need to bundle — mixing them up leads to either an unsealed joint or an over-engineered harness.
Specify the Right Heat Shrink Size
Read the chart against your actual connector and wire diameters, match the shrink ratio to the profile, and you get a seal that lasts.
Need a Heat Shrink Recommendation?
Send us your connector OD, wire OD, and environment (indoor, outdoor, buried). We will size the right ratio and wall type.
Frequently Asked Questions
How do I choose the right shrink ratio?
Match the ratio to the size gap you must bridge. Use 2:1 for small steps between wire and fitting; choose 3:1 or 4:1 when the tubing has to slip over a bulky connector and then shrink tight onto a thin wire.
Should the tubing be larger or smaller than the wire?
Pick a supplied (pre-shrink) inner diameter about 20–30% larger than the object so it slides on easily, then confirm the recovered diameter is smaller than the part so it grips. Always size from the recovered ID, not the printed one.
What does “adhesive-lined” mean, and when do I need it?
Adhesive-lined (dual-wall) tubing has an inner hot-melt layer that flows when heated and seals out moisture. Use it for outdoor, buried, or waterproof joints; plain tubing is fine for dry indoor splices.
Can heat shrink be reused or repositioned after heating?
No. Once shrunk it keeps the new shape. Position and size it before applying heat, and use a controlled heat gun rather than a naked flame to avoid scorching or uneven recovery.
How much length should I add beyond the joint?
Cover at least 10–15 mm past each side of the splice or connector so the tubing grips bare wire, not just the fitting. Too short a overlap lets the seal peel back under strain or temperature cycling.
