



Introduction
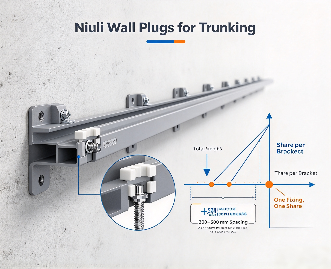
A length of heavy cable trunking looks like a tough job for a wall fixing, and in total weight it is. The mistake is treating that total as if one plug has to hold it. Trunking is supported at intervals, often every 300 to 500 mm, so the load lands on a row of fixings rather than a single point. That changes the sizing question completely. You are not choosing a fixing for the whole run. This guide walks through the five step method we use to size wall plugs for trunking runs, the embedment formula that decides plug length and the screw gauge mapping that keeps the screw and plug working as a pair.
What Heavy Trunking Asks of a Fixing That a Light Fitting Does Not
A light fitting hangs from one screw and barely moves. Trunking is different in three ways. First, it is long, so it collects its own weight along the whole span and passes a share to every fixing. Second, it moves. Temperature swings make plastic and metal trunking expand and contract, and that pumps a small but repeated load into each plug. Third, it carries cable, and a fully populated trunking can weigh several times its empty rating.
Fixed Part Selection Five-Step Method: From Load, Safety Factor to Diameter Confirmation
Start with the load per fixing
Weigh the trunking empty, add the cable weight from the manufacturer’s figures, and divide by the number of fixing points. A 2 kg per metre run supported every 400 mm puts about 0.8 kg on each plug before cable. Add the cable, say another 0.6 kg, and you are near 1.4 kg per fixing. Round up and keep the number; the next steps build on it.
Choose the safety factor deliberately
A safety factor is not a panic margin, it is a recognition that the load is not perfectly steady. For a static indoor run, 2 to 3 times the working load is enough. For a run that sees vibration from nearby plant or thermal cycling, use 3 to 4 times. For a fixing high on a wall where a failure means a costly access platform to redo, push to 4 or 5 times. The factor is your buffer against the gap between the drawing and the site.
Translate load into diameter
Here is where people want a single number, and the honest answer is it depends on the substrate and the plug grade. A high toughness PA6/PA66 plug in solid concrete holds far more than a PE plug of the same size because the polymer sits near 80 MPa against 20 to 40 MPa for PE. As a rule of thumb, the diameter steps up with load: 6 mm plugs for light short runs, 8 mm for standard trunking, 10 mm where the span is long or the run is heavily cabled.
| Substrate | Plug grade | Indicative diameter ladder | Note |
| Solid concrete, brick | PA6/PA66 (nylon) | 8 mm standard, 10 mm for long or heavy runs | Highest polymer strength of the range |
| Solid concrete, light duty | PP or PE | 6 to 8 mm | Cheaper, lower MPa, static only |
| Aerated concrete (AAC) | Longer PA6/PA66 or grip plug | 10 mm plus, longer body | Soft material, standard expansion does little |
| Hollow block, plasterboard | Cavity fixing behind board | Match to board thickness | A plug that expands in air will not hold |
The diameters above are an indicative ladder for sizing discussion, not Niuli load ratings. Confirm the actual hold with the supplier’s published pull out data or a pull test on the wall you are fixing to.
Confirm the diameter against the screw gauge
The plug and screw are a pair. A 6 mm plug takes a 4 mm screw, an 8 mm plug takes a 5 mm screw, and a 10 mm plug takes a 6 mm screw. If the trunking’s own fixing hole is only 5.5 mm, a 6 mm screw passes but a 10 mm plug’s screw may not seat the bracket flush. Check the hole before you commit the size.
Two constraints can override the calculation
Two things stop the math above from being the whole story. The trunking’s fixing hole sets the largest screw that will pass through it, which caps the plug you can use. And a weak or hollow substrate can make a larger plug pointless if it has nothing solid to bite, in which case you change the fixing type rather than the size.
Where the Plug Has to Bite: Embedment and Wall Build-Up
The formula
Plug length is not the same as embedment. The plug has to span whatever sits between the bracket face and the solid wall, then drive a minimum depth into that wall. The relationship is:Required plug length = wall build-up thickness + minimum embedment depth
Wall build-up is the plasterboard, batten, render or chase the plug must cross before it reaches substrate. Minimum embedment is the depth the plug needs in solid material to develop its hold, typically 30 to 40 mm in concrete.
Worked example
A trunking run on a stud wall finished with 12 mm plasterboard over 20 mm battens gives a 32 mm build-up. Add a 35 mm embedment into the blocking behind and the plug must be at least 67 mm long. The next standard size is 80 mm, so that is the call. A standard 50 mm plug would never reach solid substrate and the run would rely on the plasterboard alone.
Match the plug to the substrate
Solid concrete and brick take a PA6/PA66 plug driven to full embedment. Aerated concrete needs a longer plug or a specialist grip because the material is soft and the standard expansion does little. Hollow walls need a cavity fixing that opens behind the board rather than a plug that expands in air. Pick the plug for the material the tip actually lands in, not the material you can see.
Working ranges
For plain concrete, 50 to 60 mm plugs are the everyday range. Use 80 mm or longer where the build-up is deep or where you want extra stability on a long run. These are installation ranges, not load ratings; the load still comes back to the substrate and the grade.
Screw Gauge, Screw Length and the Trunking’s Own Hole
The screw must be long enough to fill the plug and still leave thread through the bracket with a washer. Too short and the plug never expands; too long and it pokes through and catches cable. Match the screw diameter to the plug from the mapping in 3.4, then add the bracket thickness and the build-up to set the length. The trunking’s hole is the quiet constraint: many trunking profiles are drilled or moulded for a 5 or 6 mm screw, and that decides the upper bound on your plug choice before load ever enters the picture.
Installing to the Specified Size
Drill the hole to the plug, not to the plug’s nominal size. A 6 mm plug wants about a 6.6 mm bit, an 8 mm plug about 8.5 mm, and a 10 mm plug about 10.0 to 10.1 mm, within a 0.2 mm tolerance. Drill to the full plug depth and clear the dust; dust in the hole is the most common reason a plug spins. Drive the screw straight and stop when the bracket is snug. Over torquing is the second most common failure, it splits the plug or strips the grip. Niuli’s anti rotation body helps here because the plug stays put while you drive, but it does not forgive a hole that is too large.
Conclusion
Sizing a wall plug for heavy trunking is less about the total weight and more about the share each fixing carries. Work from the load per fixing, choose the safety factor for the duty, read the diameter from the substrate, and never let the plug length ignore the wall build-up. Where a single fixing must carry a concentrated load, step up to an expansion bolt rather than oversizing a plug.
Specify Heavy Trunking Fixings with Niuli Electric: Niuli’s wall plugs are built from high toughness polyamide (the PA6/PA66 family) that resists breaking under the continuous shear and vibration a trunking run delivers.
FAQs
What size wall plug do I need for heavy cable trunking?
Start from the load per fixing, not the run weight. For most standard trunking on solid walls an 8 mm PA6/PA66 plug with a 5 mm screw is the common call, stepping to 10 mm where the span is long or the cable fill is high. Confirm against the substrate and the trunking’s own hole.
How much weight can a wall plug hold for cable trunking?
No single published figure applies, because it depends on the substrate, the plug grade and the embedment. A PA6/PA66 plug in solid concrete holds far more than a PE plug of equal size. Ask the supplier for the stated pull out value or run a site pull test on the actual wall before you commit the design.
What length wall plug should I use for heavy trunking?
Length follows the wall build-up plus embedment. On a bare concrete wall a 50 to 60 mm plug is normal; add battens, plasterboard or render and you move to 80 mm or longer so the tip still reaches solid substrate. A plug that stops in the build-up alone will not hold.
What screw size goes with an 8 mm or 10 mm wall plug?
An 8 mm plug pairs with a 5 mm screw; a 10 mm plug pairs with a 6 mm screw. Keep the screw long enough to fill the plug and still seat the bracket with a washer, and check it passes through the trunking’s fixing hole.
Do I need expansion bolts instead of wall plugs for heavy trunking?
Usually not, because trunking load spreads across many fixings. Use wall plugs sized by the method above. Reach for expansion bolts only where one fixing carries a concentrated load, such as a heavy junction box, a long vertical drop, or a weak substrate that a plug cannot grip. Our Plastic Wall Plugs vs Expansion Bolts guide covers that line in detail.
